Hey there!
Today I'd like to show you a snowy, icy layering, perfect for winter :)
As a base I used RdLY's French Manicure White Look, which is a sheer white polish. It's extremely shiny and jelly-like.
It has a rather thin and sheer consistency, but it glides on. It's patchy at first, and you'll be able to tell your nail line. It still builds up nicely, though, as you can see here with 3 coats.
On top of it I added a layer of China Glaze's Snow Globe, which is a clear base with iridescent glitter particles, really similar to those some snow globes contain. It's very delicate and pretty over the white!
What do you think of this combo? I like it :)
Have a happy Nikolaus day everyone!
xoxo, Misch
Showing posts with label RdLY. Show all posts
Thursday, 6 December 2012
Wednesday, 23 November 2011
NOTD November 23rd: Pac-Man Nails
Hey guys,
today I want to show you a nail art design a friend requested. She saw this video by Cutepolish *click*, and wanted me to do it :D So here it is!
I did it just a tiny bit different than in the video. For the Pac-Man I didn't use a triangular part of tape, because I tried it that way and it messed it all up. So I freehanded the Pac-Mans. For the purple stripe I used Essence's True Love from their Vampire's Love LE, and then RdLY Nail Art Pen Black (also used that for the outlining for the Pac-Man) and L.A.Colors Nail Art Deco in Blue Glitter. The yellow Pac-Man itself is L.A.Colors Nail Art Deco in Tangerine, as well as the Pac Dots.
It looks like the Pac-Mans are eating the dots, right? :D
What do you think? It's not that hard to do, and it's super fun!
Talk to you soon!
xoxo, Misch
today I want to show you a nail art design a friend requested. She saw this video by Cutepolish *click*, and wanted me to do it :D So here it is!
I did it just a tiny bit different than in the video. For the Pac-Man I didn't use a triangular part of tape, because I tried it that way and it messed it all up. So I freehanded the Pac-Mans. For the purple stripe I used Essence's True Love from their Vampire's Love LE, and then RdLY Nail Art Pen Black (also used that for the outlining for the Pac-Man) and L.A.Colors Nail Art Deco in Blue Glitter. The yellow Pac-Man itself is L.A.Colors Nail Art Deco in Tangerine, as well as the Pac Dots.
It looks like the Pac-Mans are eating the dots, right? :D
What do you think? It's not that hard to do, and it's super fun!
Talk to you soon!
xoxo, Misch
Tags:
essence,
L.A. Colors,
nail art,
nail polish,
NOTD,
RdLY
Sunday, 23 October 2011
NOTD October 23rd: Mummy Nails
Hi everyone!
Today I want to show you a nail art design that is appropriate for Halloween. It's mummy nails!
I made mine after I saw this tutorial *click* on Youtube. And I liked it so much that I just had to do it!
The white is Essence - Ahoy as both the background and the eyes. To make the mummy look a bit more real and old, I sponged on Essence - It's khaki time. And all of the black parts are made with RdLY - nail art pen black.
Do you like this design as much as I do? It's perfect for Halloween but still a bit cute ;)
I'll talk to you later :)
xoxo, Misch
Today I want to show you a nail art design that is appropriate for Halloween. It's mummy nails!
I made mine after I saw this tutorial *click* on Youtube. And I liked it so much that I just had to do it!
The white is Essence - Ahoy as both the background and the eyes. To make the mummy look a bit more real and old, I sponged on Essence - It's khaki time. And all of the black parts are made with RdLY - nail art pen black.
Do you like this design as much as I do? It's perfect for Halloween but still a bit cute ;)
I'll talk to you later :)
xoxo, Misch
Thursday, 29 September 2011
NOTD September 29th: Fall Leaf Nail Art
Hey there!
Fall is now finally really coming around, and you guys know I've been looking forward to it for weeks now :D
So I decided to do a fall-themed nail design: colored leaves.
For the base color I used a franken, which is basically a brown-toned orange. And then I stamped glitter on top of it, because fall leaves aren't always just one color, and I also wanted them to sparkle. So I stamped Red Glitter and Copper Glitter by L.A.Colors Nail Art Deco on top of it, at random spots. To make my nails look like leaves now, I drew a pattern on them that looks like leaf veins. For that I used RdlY nail art pen in black.
Do you like this design?
I'll see you soon!
xoxo, Misch
Fall is now finally really coming around, and you guys know I've been looking forward to it for weeks now :D
So I decided to do a fall-themed nail design: colored leaves.
For the base color I used a franken, which is basically a brown-toned orange. And then I stamped glitter on top of it, because fall leaves aren't always just one color, and I also wanted them to sparkle. So I stamped Red Glitter and Copper Glitter by L.A.Colors Nail Art Deco on top of it, at random spots. To make my nails look like leaves now, I drew a pattern on them that looks like leaf veins. For that I used RdlY nail art pen in black.
Do you like this design?
I'll see you soon!
xoxo, Misch
Tags:
franken,
L.A. Colors,
nail art,
nail polish,
NOTD,
RdLY
Thursday, 22 September 2011
Polish Finish Series: Matte
Hi dear readers!
So for this episode I want to show you a finish that has been very popular during the past few years: the Matte.
Matte polishes are like Cremes (what that is? *Click*), without any shimmer or anything else, but they don't dry glossy, but matte. When it's a true matte, it also doesn't have a slight sheen or something. There are a few other finishes that have a few things in common with the Matte, and I'll be showing these to you in the future. But here I just want to talk about the true matte.
Mattes dry extremely fast, and therefore you need to be quick with you application. They tend to be a bit streaky, but that is nothing you can't handle. Most of the time they need about 2 coats.
One thing to keep in mind when you are wearing a matte: Hand lotion is not the best thing, because it can make a matte more satin-y, and not fully matte. So be careful about that!
Matte polishes also tend to be a little less good in terms of wear as their shiny cousins. So tip wear can be appearing pretty soon, and also more chips are common.
Mattes can of course be turned into a glossy polish, just by adding a top coat. That will also help with the wear, but the finish will be gone.
Most brands recommend not to use a base coat and a top coat. Using a top coat is of course not good, because it'll destroy the matte finish. But a base coat can definitely be used, that doesn't create any problems at all.
For the polishes I want to show I have these:
First, Catrice's Sea Of Green from their Oceana Collection. It's a dark blue-toned green, and dries fully matte. Needs 2 coats.
The other polish is not actual matte polish, but a top coat. This one is actually a base coat by RdLY, but as a top coat it works perfectly to mattify your polish. It's called 03 Base Coat
There are top coats that mattify your polish, most brands have one by now. That's a convenient thing, because you can make any color you like matte!
Do you like matte polishes?
Hope this was helpful!
Talk to you guys later,
xoxo, Misch
So for this episode I want to show you a finish that has been very popular during the past few years: the Matte.
Matte polishes are like Cremes (what that is? *Click*), without any shimmer or anything else, but they don't dry glossy, but matte. When it's a true matte, it also doesn't have a slight sheen or something. There are a few other finishes that have a few things in common with the Matte, and I'll be showing these to you in the future. But here I just want to talk about the true matte.
Mattes dry extremely fast, and therefore you need to be quick with you application. They tend to be a bit streaky, but that is nothing you can't handle. Most of the time they need about 2 coats.
One thing to keep in mind when you are wearing a matte: Hand lotion is not the best thing, because it can make a matte more satin-y, and not fully matte. So be careful about that!
Matte polishes also tend to be a little less good in terms of wear as their shiny cousins. So tip wear can be appearing pretty soon, and also more chips are common.
Mattes can of course be turned into a glossy polish, just by adding a top coat. That will also help with the wear, but the finish will be gone.
Most brands recommend not to use a base coat and a top coat. Using a top coat is of course not good, because it'll destroy the matte finish. But a base coat can definitely be used, that doesn't create any problems at all.
For the polishes I want to show I have these:
First, Catrice's Sea Of Green from their Oceana Collection. It's a dark blue-toned green, and dries fully matte. Needs 2 coats.
The other polish is not actual matte polish, but a top coat. This one is actually a base coat by RdLY, but as a top coat it works perfectly to mattify your polish. It's called 03 Base Coat
There are top coats that mattify your polish, most brands have one by now. That's a convenient thing, because you can make any color you like matte!
Do you like matte polishes?
Hope this was helpful!
Talk to you guys later,
xoxo, Misch
Monday, 19 September 2011
Comparison: Essence I Love Stage Eyeshadow Base and Rival de Loop Young Eyeshadow Base
Hey dear readers,
since I got asked to do it, I want to compare the two eyeshadow bases I own, Essence's I Love Stage Eyeshadow Base and Rival de Loop's Eyeshadow Base. I'll be comparing them in any kind of point that comes to my mind ;)
Availability: The Essence base is available at most drugstores for a few weeks now, and is permanent. The RdLY one is only available at Rossmann, and, as far as I know, only in Germany, whereas Essence is available in a lot of countries. The RdLY one is also permanent.
Content/Price: The Essence eyeshadow base contains 4ml and costs 2,45 Euros, the RdLY base contains 5ml and costs 2,49 Euros.
Packaging: The Essence one comes in a flacon with a sponge-tip applicator. The RdLY base comes in a little pot for which you have to use a brush or your finger.
Formula: The formula on the Essence base is creamy but light, and it blends easily. You have to pay attention that you don't use too much product. The RdLY base is also creamy, but a little more sticky. Here it's not as easy to overdo it. The newer version also contains a tiny bit of shimmer, but I don't own that version.
They're both supposed to be used up within 6 months. I, however, have owned my RdLY base now fro almost 3 years, and it hasn't gone to waste. It'll go a very long time!
Application: As I said before, the Essence base has a sponge-tip applicator. You just dab a bit on your lid and then blend it out. You need to let it set for about a minute. The RdLY base has to be used out of the pot with your finger or brush. I prefer my fingers here, and that way it's also easier to blend it out.
Effect: Both eyeshadow bases intensify the colors a little, the RdLY one a bit more in my opinion. They both prevent creasing and make everything stay all day long. Although it happened to me with the RdLY base that the colors faded a bit in terms of intensity during the day. Since the new version of the RdLY base also contains a bit of shimmer, it can be disturbing when you use matte colors.
Bottom Line: So after all I can say that both eyeshadow bases do a great job. They're not really expensive, and will last a long time. You need to decide which one is more appealing to you, to most probably the Essence one because it's available at a lot more places. I like both the same, but when I have to rebuy one, I'll probably choose the Essence one, because it doesn't contain shimmer.
What I quickly want to add is this: about the Essence eyeshadow base people are arguing, some hate it, some love it. But with the RdLY one, I've barely read a negative review. Just so you know ;) I don't promise it'll work for you!
I really hope this comparison was helpful for you! Do you own any of these bases, maybe even both?
I'll see you later!
xoxo, Misch
since I got asked to do it, I want to compare the two eyeshadow bases I own, Essence's I Love Stage Eyeshadow Base and Rival de Loop's Eyeshadow Base. I'll be comparing them in any kind of point that comes to my mind ;)
Availability: The Essence base is available at most drugstores for a few weeks now, and is permanent. The RdLY one is only available at Rossmann, and, as far as I know, only in Germany, whereas Essence is available in a lot of countries. The RdLY one is also permanent.
Content/Price: The Essence eyeshadow base contains 4ml and costs 2,45 Euros, the RdLY base contains 5ml and costs 2,49 Euros.
Packaging: The Essence one comes in a flacon with a sponge-tip applicator. The RdLY base comes in a little pot for which you have to use a brush or your finger.
Formula: The formula on the Essence base is creamy but light, and it blends easily. You have to pay attention that you don't use too much product. The RdLY base is also creamy, but a little more sticky. Here it's not as easy to overdo it. The newer version also contains a tiny bit of shimmer, but I don't own that version.
They're both supposed to be used up within 6 months. I, however, have owned my RdLY base now fro almost 3 years, and it hasn't gone to waste. It'll go a very long time!
Application: As I said before, the Essence base has a sponge-tip applicator. You just dab a bit on your lid and then blend it out. You need to let it set for about a minute. The RdLY base has to be used out of the pot with your finger or brush. I prefer my fingers here, and that way it's also easier to blend it out.
Effect: Both eyeshadow bases intensify the colors a little, the RdLY one a bit more in my opinion. They both prevent creasing and make everything stay all day long. Although it happened to me with the RdLY base that the colors faded a bit in terms of intensity during the day. Since the new version of the RdLY base also contains a bit of shimmer, it can be disturbing when you use matte colors.
Bottom Line: So after all I can say that both eyeshadow bases do a great job. They're not really expensive, and will last a long time. You need to decide which one is more appealing to you, to most probably the Essence one because it's available at a lot more places. I like both the same, but when I have to rebuy one, I'll probably choose the Essence one, because it doesn't contain shimmer.
What I quickly want to add is this: about the Essence eyeshadow base people are arguing, some hate it, some love it. But with the RdLY one, I've barely read a negative review. Just so you know ;) I don't promise it'll work for you!
I really hope this comparison was helpful for you! Do you own any of these bases, maybe even both?
I'll see you later!
xoxo, Misch
Tuesday, 9 August 2011
Collective Use-It-Up! #3
Hey everyone,
I have another collective Use-It-Up post for you! This time there are more actual make-up products in it, yay :D
That's what I used up:
Astor HD Mattitude Foundation - This is my favorite foundation of the moment, and I already bought a new bottle of this one. It's great!
Maybelline Dream Mousse Concealer - This used to be my all-time favorite concealer. It has the perfect coverage and consistency, and I loved it! But apparently it got discontinued, because I can't find it anywhere near me :( So now I'm using a different concealer, the one from p2 that I showed you here *click*.
Maybelline Colossal Volum' Express Mascara - Here we have my favorite volume mascara, it's a really good one! But right now I have a different mascara to wear, so I will only buy a new bottle of this one when I use up my current one.
Essence Nail Art Sealing Top Coat - I've already used several bottles of this one, but now I've got a new top coat that I love even more, so this one won't get repurchased so far. It's a good one, however.
MaxFactor False Lash Effect Mascara - This mascara is the only one that's really waterproof on me, and it has a nice black color. But I don't need a waterproof mascara on a daily basis, and so this one won't be bought again.
Rival de Loop Yound Diamond Wish Mascara - Another mascara, yes! It was limited edition, and it was nice, but nothing I have to have. So this was probably my last bottle of it, unless they might repromote it.
I'm proud to say that I used up that many mascaras, because you can't keep them too long. Mascaras are always products that go to waste soon, because they can cause eye infections when you keep them open for too long.
Did you use up anything in the past couple of days?
See ya,
xoxo, Misch
I have another collective Use-It-Up post for you! This time there are more actual make-up products in it, yay :D
That's what I used up:
Astor HD Mattitude Foundation - This is my favorite foundation of the moment, and I already bought a new bottle of this one. It's great!
Maybelline Dream Mousse Concealer - This used to be my all-time favorite concealer. It has the perfect coverage and consistency, and I loved it! But apparently it got discontinued, because I can't find it anywhere near me :( So now I'm using a different concealer, the one from p2 that I showed you here *click*.
Maybelline Colossal Volum' Express Mascara - Here we have my favorite volume mascara, it's a really good one! But right now I have a different mascara to wear, so I will only buy a new bottle of this one when I use up my current one.
Essence Nail Art Sealing Top Coat - I've already used several bottles of this one, but now I've got a new top coat that I love even more, so this one won't get repurchased so far. It's a good one, however.
MaxFactor False Lash Effect Mascara - This mascara is the only one that's really waterproof on me, and it has a nice black color. But I don't need a waterproof mascara on a daily basis, and so this one won't be bought again.
Rival de Loop Yound Diamond Wish Mascara - Another mascara, yes! It was limited edition, and it was nice, but nothing I have to have. So this was probably my last bottle of it, unless they might repromote it.
I'm proud to say that I used up that many mascaras, because you can't keep them too long. Mascaras are always products that go to waste soon, because they can cause eye infections when you keep them open for too long.
Did you use up anything in the past couple of days?
See ya,
xoxo, Misch
Tags:
astor,
concealer,
essence,
foundation,
mascara,
maxfactor,
Maybelline,
nail polish,
RdLY,
use-it-up
Picture Tutorial: Rubik's Cube Nail Art
Hey there!
I still owe you a nail art tutorial for my Rubik's Cube nails, so here it finally is!
Let's get right into it:
That's what you need:
- a base coat of your choice (I used, as always, Essence's Pro White French)- a white polish with a thin brush (I used Essence's tip painter in white)
- all of the colors the Rubik's Cube has: red, orange, yellow, white, green and blue, as polishes (I used China Glaze - Hey Sailor; China Glaze - Life Preserver; Essence - Sundancer; Essence - Stampy Polish White; OPI - Jade Is The New Black; OPI - Suzi Says Feng Shui)
- a black polish with a thin brush (I used RdLY nail art pen)- a top coat of your choice (mine is, as always, Essence's Nail Art Sealing Top Coat)
That's how to do it:
1. Start with using the base coat on all of your nails.
2. Now it's time to use the white polish with the thin brush to create guidelines. These will help you when adding the different colors. One side of the Rubik's Cube always has 9 different little cubes, so you want to make a cross-like grid with 9 spaces. This is just like the grid of a tic-tac-toe game! The guidelines are white because that way we don't have to be super accurate when adding colors. We will later be able to correct everything.
3. Now start adding the colors. Just basically get the colors into the 9 cube spaces. You can experiment with it, make them almost finished, or totally scrambled, it depends on you! You don't have to be too careful when adding colors, we'll later be correcting them. With some colors, you might wanna do a second coat.
4. Now take the black polish with the thin brush and draw the grid again, this time it's the final lines. Now you can place the grid so that you can hide little flaws.
5. Finish off with a top coat to protect the design.
That's it! It takes some time, but it's really easy and super fun and colorful :)
Will you try it out?
I'll see you soon!
xoxo, Misch
I still owe you a nail art tutorial for my Rubik's Cube nails, so here it finally is!
Let's get right into it:
That's what you need:
- a base coat of your choice (I used, as always, Essence's Pro White French)- a white polish with a thin brush (I used Essence's tip painter in white)
- all of the colors the Rubik's Cube has: red, orange, yellow, white, green and blue, as polishes (I used China Glaze - Hey Sailor; China Glaze - Life Preserver; Essence - Sundancer; Essence - Stampy Polish White; OPI - Jade Is The New Black; OPI - Suzi Says Feng Shui)
- a black polish with a thin brush (I used RdLY nail art pen)- a top coat of your choice (mine is, as always, Essence's Nail Art Sealing Top Coat)
That's how to do it:
1. Start with using the base coat on all of your nails.
2. Now it's time to use the white polish with the thin brush to create guidelines. These will help you when adding the different colors. One side of the Rubik's Cube always has 9 different little cubes, so you want to make a cross-like grid with 9 spaces. This is just like the grid of a tic-tac-toe game! The guidelines are white because that way we don't have to be super accurate when adding colors. We will later be able to correct everything.
3. Now start adding the colors. Just basically get the colors into the 9 cube spaces. You can experiment with it, make them almost finished, or totally scrambled, it depends on you! You don't have to be too careful when adding colors, we'll later be correcting them. With some colors, you might wanna do a second coat.
4. Now take the black polish with the thin brush and draw the grid again, this time it's the final lines. Now you can place the grid so that you can hide little flaws.
5. Finish off with a top coat to protect the design.
That's it! It takes some time, but it's really easy and super fun and colorful :)
Will you try it out?
I'll see you soon!
xoxo, Misch
Tags:
China Glaze,
essence,
nail art,
nail polish,
OPI,
RdLY,
tutorial/how-to
Thursday, 21 July 2011
Picture Tutorial: Ladybug Nail Art
Hi everyone,
a few days ago I posted a collective nail art post *click*, and asked for what you wanted a tutorial. One of the requested things was the ladybug nails, so I'll start with it! Don't worry, I'll be doing the other requests soon, too :)
That's what you need:
- a base coat of your choice (I used, as always, Essence's Pro White French)
- a true bright red (I used China Glaze - Hey Sailor!)
- a regular black creme (I used p2 - eternal)
- a black polish with a thin brush (I used RdLY Nail Art Pen Black) OPTIONAL
- a white polish (I used Essence Stampy Polish in White)
- a tool, like a toothpick or a dotting tool (I used Essence's Nail Art Stylist)
- a top coat of your choice (mine is, as always, Essence's Nail Art Sealing Top Coat)
That's how to do it:
1. Use your base coat on all of your nails.
2. Paint your full nails with the bright red, use as many coats as needed.
3. Use the black polish to create a black tip, like with French manicure. It's really easy to do this free-hand when you twist your nail while you paint.
4. Take the thin brush with the black polish and make a line that separates your nail in half. If you don't have a black polish with a thin brush, you can use regular polish and a toothpick.
5. Use the tool and the black polish to do the ladybug's dots. You can make them matching, or totally random, depending on how you like it.
6. With the white polish and the tool, make your ladybug's dots. These will add extra cuteness.
7. Seal everything with your top coat.
I hope this tutorial helped you out! It's really easy do with some patience :)
Until then you guys,
xoxo, Misch
a few days ago I posted a collective nail art post *click*, and asked for what you wanted a tutorial. One of the requested things was the ladybug nails, so I'll start with it! Don't worry, I'll be doing the other requests soon, too :)
That's what you need:
- a base coat of your choice (I used, as always, Essence's Pro White French)
- a true bright red (I used China Glaze - Hey Sailor!)
- a regular black creme (I used p2 - eternal)
- a black polish with a thin brush (I used RdLY Nail Art Pen Black) OPTIONAL
- a white polish (I used Essence Stampy Polish in White)
- a tool, like a toothpick or a dotting tool (I used Essence's Nail Art Stylist)
- a top coat of your choice (mine is, as always, Essence's Nail Art Sealing Top Coat)
That's how to do it:
1. Use your base coat on all of your nails.
2. Paint your full nails with the bright red, use as many coats as needed.
3. Use the black polish to create a black tip, like with French manicure. It's really easy to do this free-hand when you twist your nail while you paint.
4. Take the thin brush with the black polish and make a line that separates your nail in half. If you don't have a black polish with a thin brush, you can use regular polish and a toothpick.
5. Use the tool and the black polish to do the ladybug's dots. You can make them matching, or totally random, depending on how you like it.
6. With the white polish and the tool, make your ladybug's dots. These will add extra cuteness.
7. Seal everything with your top coat.
I hope this tutorial helped you out! It's really easy do with some patience :)
Until then you guys,
xoxo, Misch
Tags:
China Glaze,
essence,
nail art,
nail polish,
NOTD,
p2,
RdLY,
tutorial/how-to
Friday, 24 June 2011
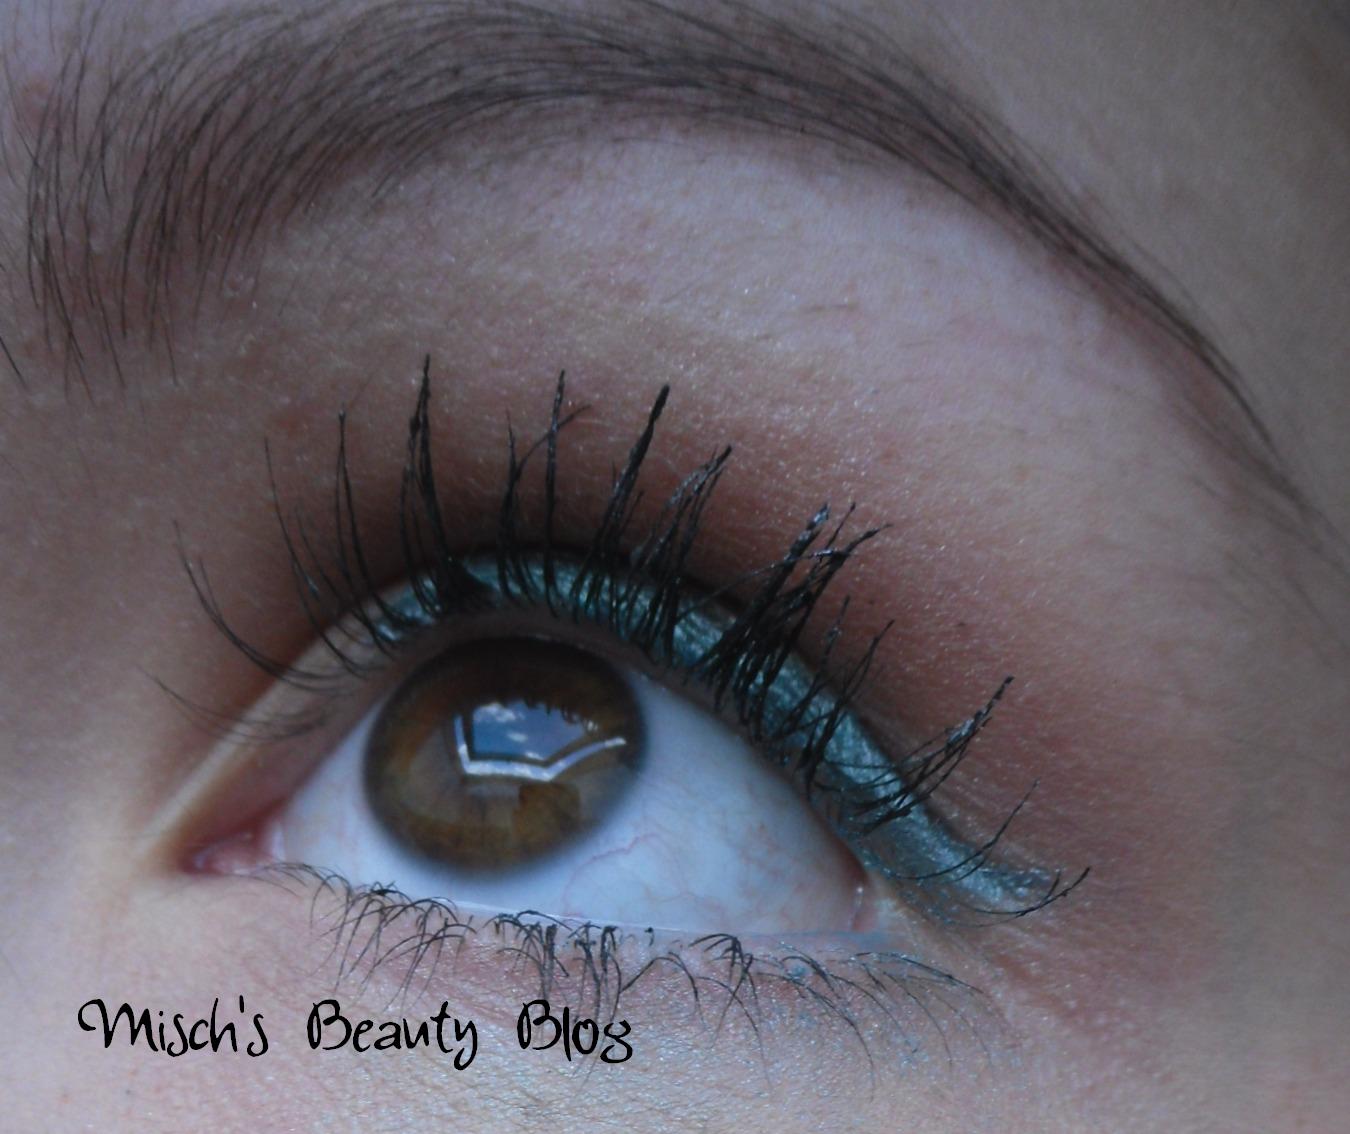
EOTD June 24th: Fun Summer Look
Hi dear readers!
Today I have an EOTD for you that I like to wear when it's warm outside. It's really cool for summer in my opinion!
I kept it simple for the eyeshadows, and just added 602A, a shimmery frost brown to my crease. The main focus is on the colored eyeliner, and for that I first applied just a normal line of RdLY's liquid eyeliner in 04 Silver Star. Then I added the teal/turquoise shimmer color on top, and for that I used an eyeshadow from the Manhattan MyBox series called 89B. To apply it, I used an angled brush, the one by Essence that I reviewed here *click*.
For mascara I used Maybelline's Great Lash Mascara.
What you have to be careful about is the silver eyeliner. The one I used tends to get onto my lashes which just doesn't look good. Keep an eye on that!
Do you wear these type of looks, too?
I'll see you later!
xoxo, Misch
Today I have an EOTD for you that I like to wear when it's warm outside. It's really cool for summer in my opinion!
I kept it simple for the eyeshadows, and just added 602A, a shimmery frost brown to my crease. The main focus is on the colored eyeliner, and for that I first applied just a normal line of RdLY's liquid eyeliner in 04 Silver Star. Then I added the teal/turquoise shimmer color on top, and for that I used an eyeshadow from the Manhattan MyBox series called 89B. To apply it, I used an angled brush, the one by Essence that I reviewed here *click*.
For mascara I used Maybelline's Great Lash Mascara.
What you have to be careful about is the silver eyeliner. The one I used tends to get onto my lashes which just doesn't look good. Keep an eye on that!
Do you wear these type of looks, too?
I'll see you later!
xoxo, Misch
Thursday, 23 June 2011
My Eyeshadow Collection #5: Blues and Greens
Hey guys,
today I have the last post of my eyeshadow collection in terms of monos and duos - I think at least. So don't be surprised if there'll be another post coming up ;) Here are my blues + greens!
Essence - 29 C'est la vie
This eyeshadow's been discontinued for quite some time, but I still like it. It's a shimmery medium green, not too pigmented but still nice. I used to wear this a lot last year!
Essence - 25 Last Call
Here we have another discontinued eyeshadow, a very light blue/turquoise. I bought this when I was really young, it was one of my first eyeshadows, because I read in a magazine that this color would flatter my eye color :D It's just shimmery and not really pigmented.
Catrice Oceana LE - C03 Sea Of Green
This eyeshadow is a vibrant matte green, really pretty for summer. I used it in an EOTD last year *click*. It was unfortunately limited.
MNY - 301A
This is a shimmery military kinda color, a khaki olive shade. It was part of some LE, but I don't remember the name, sorry :/ Pigmentation is good with this one.
Alverde Baked Eyeshadow - 06 Intensive Turquoise
Here we have a baked and unfortunately discontinued eyeshadow. It's a shimmery metallic and vibrant turquoise, but it looks better when applied wet.
RdLY Quattro - 02 Blue Lagoon
This is a quad, but I'm mentioning it here because it has the packaging of a normal mono eyeshadow. It's a light blue, two medium shades, all shimmery, and a black with blue glitter particles. This one's still available, I think. Pigmentation is okay.
Swatches:
| these are just from the RdLY quad |
All swatches were done without a base.
So guys, that's it for my greens and blues! Hope you liked this series!
Until next time,
xoxo, Misch
Subscribe to:
Posts (Atom)