Showing posts with label Blogging-Techniques. Show all posts

Thursday, 8 September 2011

Blogging-Techniques: Swatching Session

Hey there!
So this episode of Blogging-Techniques will be about Swatching Sessions and what you need for it. When I get new products, or want to make a series, I always sit down, swatch my stuff and photograph it. There are a few things to keep in mind when you do that, and I wanted to share them with you.

  • Make sure that the product you're swatching has already been photographed before. If you swatch it, it might destroy the optic, and for the sake of your blog you want to have the pictured before. What I learned during my blogging time: first photograph it, then touch it!
  • Get everything ready: the product(s) you're swatching, your camera, stuff to remove it, etc.
  • Setting: what about the background?! And do you get the chance to photograph everything in daylight, maybe even sun and shade? (more advice for pictures: *click*)
  • Clean hands: don't get your swatch mixed with anything that could affect it, also not if you're doing more swatches in a row!
  • Time: especially if you want to swatch more than one product, you should have enough time to do them all properly
  • Pigmentation: if it is barely visible at the first swatch, you might wanna use a base or more coats. But don't forget to mention that in your post!
  • Variety: rather photograph it a few times too often than not enough! Also at different angles.
I think that these are the most important things concerning swatches. When I sit down to swatch, I'm really careful with everything, because swatches can be used all the time. And if you once have a good swatch picture, you'll never have to re-do it. 
When I swatch, I do a lot of swatches, like my whole eyeshadow collection or with my 120 palette, I did 60 swatches on one day! That's why I always have remover wipes and tissues in handy.
Do you do swatching sessions? Or do you keep some rules?
I'll talk to you guys soon!
xoxo, Misch

Sunday, 4 September 2011

Blogging-Techniques: Full Face Photos

Hey you guys,
a few days ago (or already more?!) Salander asked me to do a Blogging-Techniques post about full face photos. So here's another post with just my opinion, keep that in mind, you can have a totally different view on this.
Full face photos are a thing you need to think about. On the one hand, these pictures can show you products way better, you see the whole appearance. That way applied blush, foundation or whatever is good to be seen.
But there are again a few downsides. I guess there are always haters you will comment and insult you, and that's just a thing that might not make it worth post pictures of yourself. But on the other hand, if you like yourself, you should be comfortable with showing it to everybody, so you decide.
What could be a problem, too, is that these pictures can be seen by everyone, and it's really what you look like, not only an eye or something. That way you could be found more easily, and it can also make a boss of yours find you on the internet. Some companies don't like that, and won't employ people who have a lot of personal stuff on the internet. Just keep that in mind.
I personally rather choose not to post full face pictures of myself. I do have pictures of myself on Facebook, but there my profile is only visible for my friends, and no one I don't know.
If you want to post full face pictures, then I would say at least look that they're pretty :D I don't think you want something weird about you appearing everywhere, right?!
I hope this was a little interesting for you guys, and answered your question well, Salander :)
Let me know about your opinion!
Until next time,
xoxo, Misch

Saturday, 20 August 2011

Blogging-Techniques: Giveaways

Hi there!
A while back, lovely Salander asked me about giveaways, and what I think of them. I'm now just gonna tell you about my opinion, hopefully you'll like it :)
Generally, I think giveaways are nice idea. You get something for your readers, and one or a few of them will be happy with the prize. But there are a few things to keep in mind. First of, you can't give prizes to all of your readers, or at least most don't, and there are always sore losers who just can't be glad for someone else. Then, the prizes are hard to choose. Do you want to give away something special or expensive, or rather a whole bunch of inexpensive stuff. You need to be able to pay for all of it, and the shipping. That leads us to another problem: to what should I open the giveaway? Internationally can be so expensive in terms of shipping costs, but when you just do it for people in your country, there'll most likely be people who complain about it.
What I also really don't like is people who just have a blog to take part in giveaways, and also people who only subscribe to a blog because of the giveaway. If there's a new reader, I want them to be there because of the blog's content and not the giveaway, right? That's why I'm always a little suspicious about blogs who have a large number of readers and a giveaway up every few weeks.
I know this all might sound a bit negative, but it's really not all like that. I think giveaways are a great idea to thank your readers, as long as they all appreciate it. I myself don't take part in them too often, because I tell myself I won't win anyway ;)
I think featured giveaways, meaning with sponsored products are okay, as long as it doesn't get promoted too much.
Personally I right now unfortunately can't afford a giveaway. I hope I'll be able to do one in the future, but there's nothing sure about it. I really wanna thank all of you, and when there'll be a giveaway, I'll make sure you'll all like it :) And I think it's great that I reached 50 subscribers without having to do a giveaway, because it has to mean that you like my blog for its content ;)
I hope this post was the way Salander had wanted it to be :D
Do you have any other requests? And what do you think about this topic?
I'll see you guys soon!
xoxo, Misch

Tuesday, 2 August 2011

Blogging-Techniques: Comments

Hi guys!
Today's topic for Blogging-Techniques is Comments. In the last episode I was asked by Salander to do a post about comments, especially comment approval.
I approve all of the comments on my blog, because I want to know what is going on.
There are a few things that I want to prevent by doing this: spam, advertisement and rude content.
Spam is just annoying, it really upsets everyone and I just don't want to have that on here. My blog is a spam-free zone, and I want to keep that.
Then, advertisement is the next unwanted thing. I understand that everyone who has their own business wants to make it popular. But they can do their advertisement somewhere else, not here. I already do a lot of advertising for the brands I recommend on here, and I don't get anything for that. That's the way it is when you blog about products, and I don't think that's a bad thing. But that way I can at least decide which brands get on my blog, and which not. If I would let people post any commercial and advertising stuff in the comments, it would get out of hand, and that's what I don't want.
And the last thing are comments with rude content. On my blog, I don't want to have any bullying or insulting. I don't really know about it, but I guess I also have younger readers, and this point is also for them. I know that you can read rude comments and insults at a lot of places, but my blog's none of them. And it's also just not polite or in any way bearable to leave rude comments. If you have a problem, we can for sure talk about it in a calm way, but insults and stuff like that will never help. And that's why I will never publish anything like that on here.

Since I need to approve all of the comments, I make sure I read every single comment. I appreciate them all, and by approving them, I can also immediately reply to them.
Luckily there haven't been any big issues with rude contents on here, and I'm glad about it :)
Do you approve the comments on your blog?
Until then,
xoxo, Misch

Friday, 22 July 2011

Blogging-Techniques: Layout

Hey guys!
For this episode of Blogging-Techniques I'll be telling you what is important about the layout and stuff of a blog.
When you are picking out you layout, there are always a few things to keep in mind. Here they are:

  • don't make font too small or big: it should be easy to read
  • don't make the background too distracting: you want people to look at your post, not the background
  • don't use a font color and a background color that are too similar: it's supposed to be easy to read, remember?
  • make sure it's all comfortable for the eye: for example a black background and white letters can make the eyes hurt easily
  • give enough space to everything that is on your page, you don't want it to be crowded
  • make it easy to find something, not too confusing
The best thing is to think about what your reader would like and what not. That's the easiest way! After all, you want your blog to be visually attracting so the reader comes back, right?!
You can always add extensions and stuff to your sidebar, and they can make your blog a lot more personal and also make the layout prettier. For example a search tab, a poll or a "About Me" section can be really interesting and is easy to add. Just go to your layout section on Blogger and add it :)
For my background, I like to use really cute designs, and on http://www.thecutestblogontheblock.com/ you can find really pretty ones for free. I like them a lot!
To me, my banner is another essential part of my layout. Here *click* I showed you in a tutorial how to do it.

After all, what I can mainly tell you is that it's best when you experiment with it. Try out different things, find your style with it, and have fun!
I also like to change my layout every now and then.

I hope you found this helpful!
Until next time,
xoxo, Misch

Tuesday, 12 July 2011

Blogging-Techniques: What I Find Important Concerning Other Blogs

Hi guys!
I was asked to do an episode of Blogging-Techniques about what is important to me when I read other blogs, what kind of things make me subscribe and sometimes even unsubscribe. So here you go :)
Some of the things that are important to me when reading a blog are things that I personally try to do on my blog, too. Sometimes that works better or worse, but I still try my best.
It often happens that you stumble across a blog that looks pretty promising and nice at first sight. But before I subscribe to a blog, I always look through the whole blog and watch out for a few things.
Here's my list:
  • How often do they blog?  - I don't want to subscribe to a blog that only has a post up every few weeks. So the latest post should at least be published in the past 7 days or something, and I also look a bit through the blog's history to see that :)
  • About what topics do they blog? - if the blog's about like 5 topics, but only one of them interests me, then I'm not sure whether I'll enjoy the blog as much.
  • Is there a nice variation of posts? - I like change, and if they blog only about one thing all the time, it's a little hard for me to like the blog.
  • Do they have good quality pictures? - If the pictures they use aren't good ones, that's not a blog I'll like. Only cellphone camera pics are just not enough.
  • Is the language they use good? - When I read a blog, I really want to find a nicely written text, and not some ghetto-like (sorry for that expression) stuff.
  • Do they do honest reviews? - I always compare stuff they talk about, and if they have only bad or only good reviews, it might not be too honest.
  • Are they sponsored? - I don't have anything against people who are sponsored and talk about stuff that was provided for them, but if they only talk about things they've gotten for free, I don't like it too much.  
  • Do they have a personality that seems likable to me? - On a lot of blogs, you can find parts of their personality how they write their posts and about what. And the "About Me" part also helps a lot with this. I don't really subscribe to a blog by someone who doesn't seem likable to me.
That's what I try to look for :) And luckily, most of these things are true with a lot of blogs I discover :)

Have I ever unsubscribed? Yes, I actually have, but only when either the whole blog atmosphere or topic section changed, or when they stopped blogging. It's not nice to unsubscribe, and I don't like to do that, because when you see on your blog that you have less followers than before, that's a negative feeling. But sometimes you just have to do it...

Now, tell me: What is important to you? Have you ever unsubscribed? And what do you want for a future episode of Blogging-Techniques? I'd like to know :)
Until next time,
xoxo, Misch

Monday, 4 July 2011

Blogging-Techniques: How I Find Time For Blogging

Hey everyone!
Today I have a new episode of Blogging-Techniques for you guys, about how I find time for blogging :) In the last post about how I prioritize my posts *click* I already mentioned that at the beginning of a new week, I sit down and make drafts for all the post I'm gonna do that week. Well, the drafts I do only have the title, and nothing else. But somehow I have to find time to write the whole post!
To start off, pictures. These are - to me - the hardest part of  a blog post, because the light has to be okay, and you can't do them at night when there's not daylight. So I most of the time do a lot of pictures on one day, like a swatching series or I go through my whole lipstick collection and take pictures of them all. That way, I already have some pictures in advance. Whenever I buy something new, I immediately photograph it, even before I tried it out only once!
The posts are most of the time written at night, because that's the only time that I'm free to do it. During the day, I'm at school, I study, I hang out with friends. And then at night, I sit down and blog. Only when I'm in the mood to, though. Then I really try to get something done, and write at least 2 full posts. 
Sometimes I have a little extra time, and then I spend it on little stuff. I either edit my pics, for example cut them, or put my signature onto them. Or I go to the blog posts that are planned for the week, and adjust date and time, or add the tags I put onto them. That's done pretty quickly, and it's not hard to do, but it's something that has to be done and it helps when you already have it. That's 2 minutes saved when you're writing full posts the next time, and so you can do even half a post more. 
I also blog to relax. When I have a lot of pressure, I take time off by writing on my blog. That's a great way to do it, because I really enjoy blogging!
And I also rather go blogging than watching tv or reading a book.
The only I can't do is writing multiple posts a day. The past 2 days I had 2 posts a day, because I had some time off and enough time to do them. But I couldn't manage posting more than 3 posts a day on a regular basics.
So, in my opinion it's not too hard to find time for blogging, you just have to do little things any time you can!
How do you find time for blogging?
And do you have any ideas or requests for the next Blogging-Techniques episode? Let me know!
I'll see you later!
xoxo, Misch


BTW: A happy 4th of July to all my American readers :)

Monday, 27 June 2011

Blogging-Techniques: How I Prioritize My Posts

Hey guys!
Today's episode of Blogging-Techniques will be about how I prioritize my posts. I already told you how I find inspirations for my posts here *click*. But after knowing what to blog about, you need to know when!
I have a kind of system I use, and it works for me. This is not the way you have to do it, but it's a possibility.
On either Sunday or Monday of each week, I take some time and sit down to plan a little ahead of time for my blog. I think of whatever post comes to my mind, and then look at the following criteria:

  • what type of post it is (review, EOTD, etc.)
  • how often I did a post of this type in the past 2 weeks
  • if the pictures for the post are already taken
  • if there's a lot of pictures to edit & cut 
  • how much I'd have to write for this post
  • if the posts about something from a LE, so it has to be done soon
  • whether the post's something that has to be posted at a certain date
Then I take about 5 to 7 seven posts that come to my mind, and write a new post for each of them. But all I do is write the title, and then safe it in drafts. This doesn't take a lot of time, but then there's a lot already done. 
Now I have to think about when I have time to blog. There might be a night were nothing's planned, and then one where I won't find time. According to that, I schedule the rather long posts for free days, and the shorter ones for more busy days. 
For the order of the posts, I think about change and variation. I try not to post more than one post of a type a week, and also to switch up the topics. If today's post is about an eyeshadow, then the next two won't be. 
When I have the date for each post set in my mind, I go to each post and schedule it for that day. That way Blogger will arrange the posts in the "Edit Posts" section the way they are supposed show up. 
This way I have about a week planned, and I can write the posts when I have time to. There will be a lot of variation in the posts, important things will come up first and longer posts when I have time for them.
I hope this helped you out! 
In the next episode I'll tell you how I go on, because I'll be talking about how I find time for writing the posts we just scheduled. 
How do you prioritize you blog posts?
Until next time,
xoxo, Misch

Wednesday, 22 June 2011

Blogging-Techniques: How I Get Inspirations For My Blog

Hey everyone,
this is another request I got for this series. So now I'm gonna let you know where I find inspirations for my blog. 
Since this is a beauty blog, I don't have to be utterly creative or anything, but there's still times when I just don't know what to blog about.
But if you look a little further, you'll almost always be to find something to blog about. There are a few posts that I always do, for example monthly favorites, and when it's time for one of these, I have something, and I know what to blog about. 
Sometimes I just go through my pictures and look at what I haven't spoken about on my blog yet. A good idea for spontaneous posts is reviews about products you use all the time. A nice review about a permanent product that you've been using for quite some time is always easy to write. A plus to that is also that you don't have to wait for a certain amount of time to pass before you can review it. As I mentioned in my "How I Write My Reviews" post, I try out a new product at least 5 times and owned it for at least a week before I review it. With reviews about "older" products, you don't have to do that.
When there's a new collection out or a new release or maybe a change of the permanent line, I can always blog about that. That's easy, especially when I already spotted it, and if not, I can still make a post about what's new and, if it is a permanent line change, what's gonna get thrown out.  
Swatching posts are also pretty easy to do, but only if you have the pictures done, or time to shoot them.
When I go to the store, I pretty much all the time find inspirations. No matter whether I buy a new product I can talk about or I spot a new collection. And sometimes I even see a new mascara, and then think: Oh, I've got one to show on my blog laying around at home!
It's really pretty easy to find inspiration for your blog, just have to look everywhere and think of what could interest your readers. Maybe you got a request, so you can do that!
The only problem that happens to me sometimes is that I want to blog about something, but then don't have the pictures done for it. It's maybe 9 pm, and I really feel like blogging, but I don't have any photos ready. And I can't shoot some at that point of time, because I always do my photos in daylight, as I explained in the "How I Shoot My Photos" post, which is just not available at 9 pm. Then I have to hope there's something pre-blogged ;)
So if you want to blog, you will most of the time find some inspiration for it.
Only if you feel like you have to blog, but don't want to, and you just won't get inspired by anything, then don't do it. Rather skip a day of blogging than writing a forced post your readers won't fully enjoy.
I hope this helped you out somehow, because I can't share any secret tips on how I get inspired, because I don't really have some ;) But I still wanted to do this request.
The next post in this series will be about How I Prioritize My Posts.
Until then,
xoxo, Misch

Friday, 17 June 2011

Blogging-Techniques: How I Did My Banner

Hi guys,
I got the request to make a tutorial on how I did my banner, so here that is :)
I just want to say first of that this is my way on how to do it, and you don't have to follow my instructions, it's just an example. And of course there are ways to make it quicker or more convenient, but I just do it this way so it's easy and doesn't cost anything.
In this tutorial I didn't do the exact same banner as I use on my blog, I only did one as an example.
I took all the screenshots myself and marked everything important with red circles. To really see everything precisely, just click onto the pictures to enlarge them.
My computer works with Windows XP, just in case you're wondering.
Here's how I do it:
1. This is more of a preparation step, and I just do it so it's easier in the following steps. You want to put all the pictures you're using in one folder. If your banner's supposed to have the same size as mine does, you want to select 12 pictures that all fit your blog's topic. Try to use different ones, so the banner's not boring.
2. In the second step you want to go to Picnik.com, and click on "Get Started Now" (marked red) so it starts load the application.
3. When you're on the main page you want to select "Collage", it's marked red here.
4. That will lead you to a new page. There you want to select the quad sign on the left sidebar, it's marked red again. You won't be able to do bigger collages in one step, because that would cost some money. To upload your photos to use in this collage, hit "Upload A Photo" in the green bottom bar. 
5. After you hit that button, a new window will open up where you can look for your picture and select and open it, it's all marked red in the screenshot. Always only upload one photo at a time, because Picnik won't save them otherwise. When your photo's fully uploaded, it'll show up in a mini format in that green bottom bar, and you'll be able to drag it into the grid. Then you can upload the next photo.
6. To make it all a little more fun, you can play around with some details. I want my collage to be straight, so I only changed the spacing of the photos and the grid color. That's really easy to do, I marked it for you again. You can also be creative and change some other things, for that there are more symbols to click. Just have fun and play around with it a little :) When you think your collage is nice the way it looks, hit the "Done" button on the upper right corner.
7. Now you'll get to the "Edit" section. If you want to edit your collage, you can do that there, but I didn't do that with mine, so I'm not explaining that here. To skip editing, just click on "Save&Share". 
8. This will lead you to the saving page. There you can save the collage to your computer but also share it on some websites. I'm only saving it on my computer here. You can change the file name and JPG Compression Quality (I always use the best one, 10) in the marked spots and then click save. That'll open a new window and there you'll be able to put it into the folder you'd like it to be.
9. When you're done, it'll ask you what to do next, and you just have to click "Close Photo". You'll get back to the main page that way.
10. For the next quad collage, just repeat the steps 3 to 9, that should work pretty quickly since you now know what to do.
11. With the 3rd collage, it's the same to do. Only one thing I want to add: When your picture is bigger to the sides than the collage frame is, there'll be a arrow appearing when you move the mouse over the picture, like the marked one in the yellow nail wheel picture here. With that arrow you'll be able to move that photo so you're able to decide what should be in the collage. 
Then just finish and save this collage like the previous ones.

12. Now you want to add all three quad collages to one big banner one. To start doing that, you want to select "Collage" on the main page, but don't use the quad one this time. Instead, click on the "3-quads-in-a-row" symbol on the left sidebar. It's marked here. Then click upload again, and this time select the collages on after the other.
13. That way you'll be able to add all 3 quad collages to one big banner. You can play around with spacing and the grid color again. When you like the way it looks, hit "Done" and save it the way I explained in steps 7 to 9.

14. Now we're done with Picnik. What you want to do now is go to the folder where you saved your banner, and right-click on it. Then select "Edit" in the appearing menu, that will lead you to "Paint". 

15. There you want to select the text tool, which is the big "A" in the left sidebar, and then click the lower of the 2 appearing signs, so it doesn't add a white space to your banner. Then you can drag the space for the text into the middle of the banner or wherever you want it to be, and adjust font and font size. 
16. Now you can type the name of your blog or anything else that you want to be on your header. The advantage to using "Paint" for this job is that you can also use your personal fonts that you have on your computer. Of course save the version with the name on it!
That's what my complete banner looks like:
17. Now you want to go to your Dashboard on Blogger and select "Design".
18. For the final steps, you want to click on "Edit" in the Blog (Header) section, and then upload your image in the appearing window. Something important is to select "Instead of title and description", because then there won't be any weird letters disturbing your header, and you'll only have the banner there. In this screenshot, I didn't upload the new created header, because I wanted to keep my old one. 
And that's it! I know that this tutorial is a really really long one, but I wanted to make it almost fool-proof, and I hope this helps you out! Let me know if you have any other questions, and also if you did a banner for your blog now :D
BTW: Today's my birthday, yay :D
I'll see you soon!
xoxo, Misch

Sunday, 12 June 2011

Blogging-Techniques: How I Shoot My Photos

Hi you guys!
I just lately started a new series called Blogging-Techniques, and here *click* I showed you the first episode, how I write my reviews.
Now it's time for a post about how I take my pictures!
I really think that pictures are one of the essential parts of blogs, because without any photos you wouldn't be able to see the colors or products I'm talking about. A word description can never be as clear as a photo. So I hardly post anything without pictures in the post.
When taking pictures, it's really important to have a good camera. Some of my followers who have been reading my blog for more than half a year now might remember my bad-quality pictures from back then. Well, I didn't have a better camera, and you could see that in the pictures. Luckily I now have a better one. The one I'm using is the Samsung PL80 digital camera, and I'm really content with it. As you can tell by the photos I post, it takes good ones, especially in the Macro mode. That one is really really important when it comes to make-up pictures. For those of you who don't know it, with the Macro mode you're able to take photos that are really close to the object, and they're still focused. On this picture example you can see that: The first picture was taken in the normal automatic mode, and the second one in the macro mode.
normal
macro; the polish is Essie - Limited Addiction, btw *click*
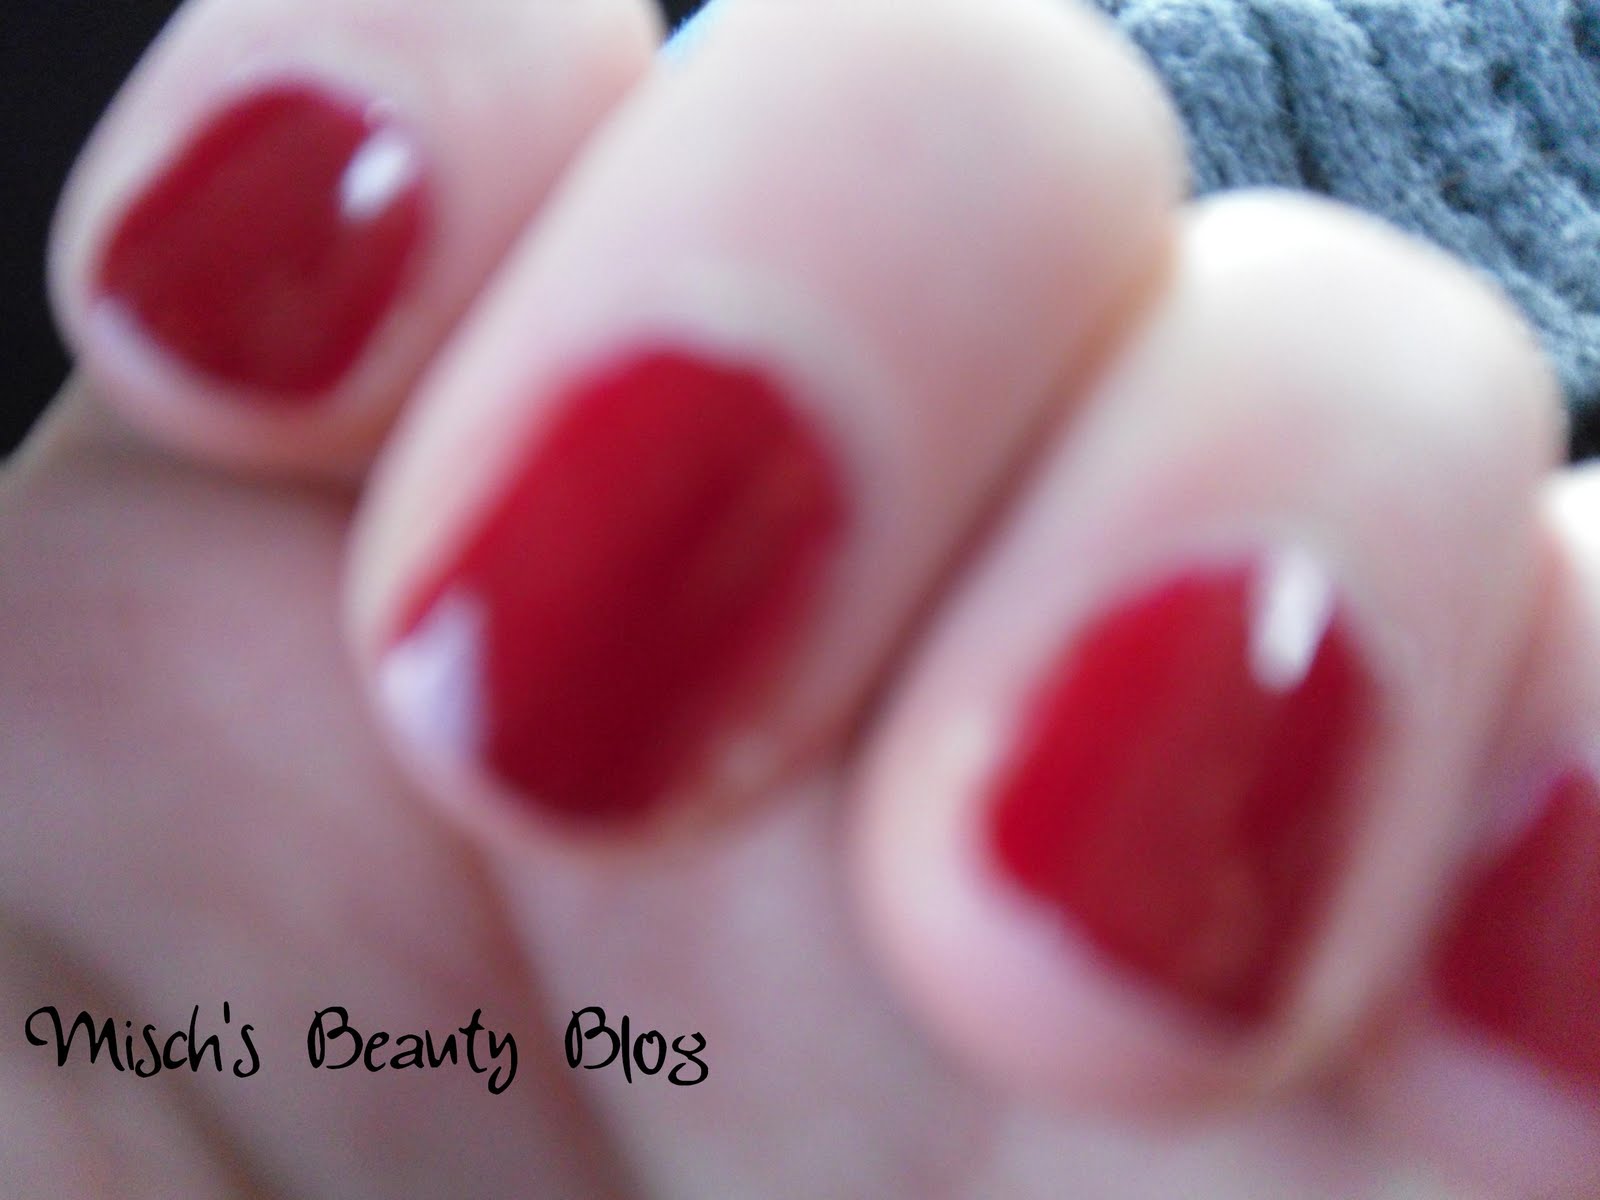
Then the lighting is important, of course. I always try to take my pictures in both direct sunlight and normal daylight, but sometimes the sun's just not showing up. But I definitely never take my pictures in artificial light or with flash. They're all taken in normal daylight, because that just makes the colors look way more true to what they look like in real life. Some colors, like red, are really hard to capture, but in normal daylight it works fine most of the time.
You should also pay attention to the background. I try to do mine with a neutral, or, in the best case, white background, but as you can tell from my photos that's not always working. Just keep in mind that the background color can always have an effect on how the color of the thing you're taking a picture of looks like on the photo. So neutral backgrounds are best.
I 
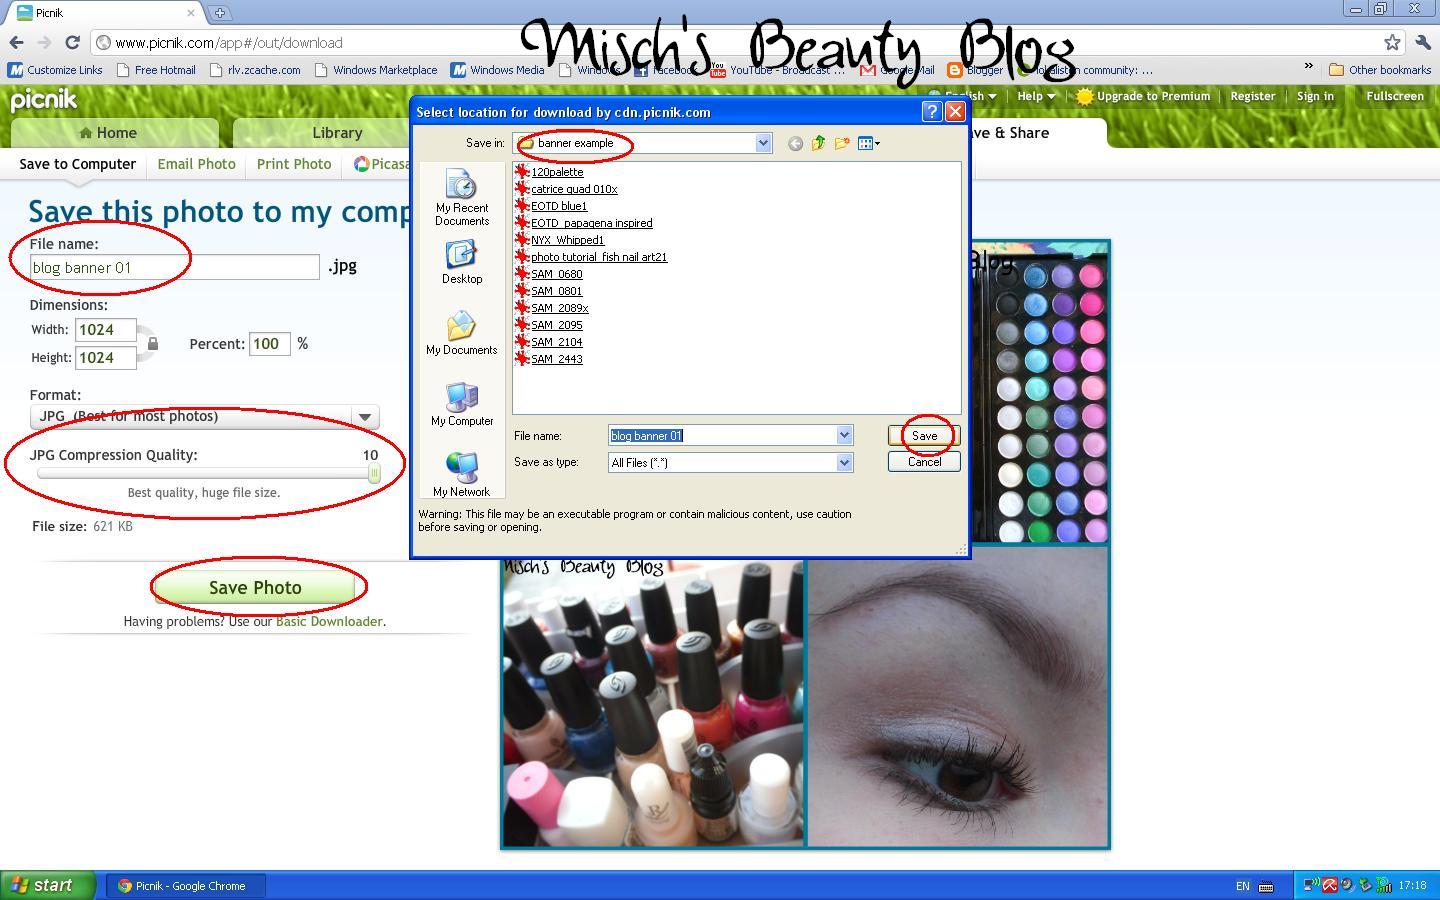
never change colors or retouch my photos, because I want them to be the way they are in real life. The only thing I do is that I cut and turn them, or put them in collages. For that I use the website Picnik.com, because it's free and does a good job for me.
The size is also important, I always do the pictures so you can still click on them to enlarge them. I want you to be able to see any little details, and that they are still focused.
Next I take more than one picture. When you take a decent amount, you'll be able to select the pretty ones and don't have to take what you got. I also think it's important to include some more photos into a blog post, so you can get and overview. Every picture has some good and bad sides to it, and a bigger number can show it all.
I don't try have the perfect photo frame with every shot. Most of the time, every picture I take is shows about twice as much as I want it to show. When I take lip photos for example, on most of the pictures you can also see my nose and my cheeks. And afterwards I cut out what I really need, in this part only the lips. It's just way easier that way, and not every shot has to be perfect.
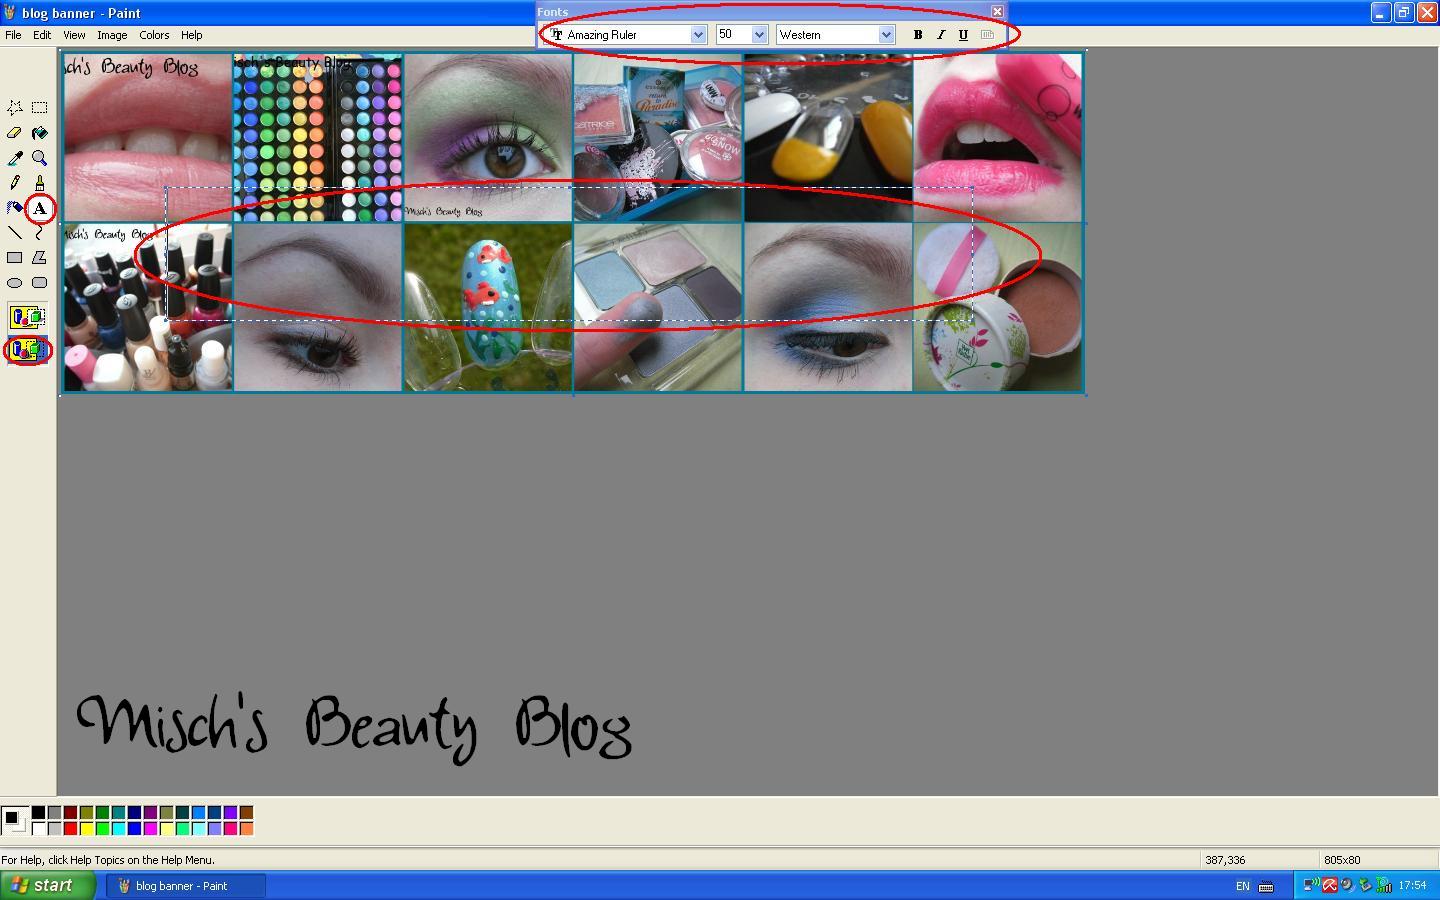
There's always a signature on my pictures. It happens quite often that people just download pictures from other people and then use them as if they were their own. So when somebody has to download my pictures, there's at least my signature on it. If you want to use my pictures, you can do that, but please give me credit for it! That's that ;)
So guys, I'm sorry that this post's this long, but I hope you found this informative! Did I leave anything out you want to hear about? And what do you want for the next episode of Blogging-Techniques?
Until next time,
xoxo, Misch

Saturday, 28 May 2011

Blogging-Techniques: How I Write My Reviews

Hi guys,
I'm starting a new series called Blogging-Techniques. I'll basically share with you how I do this and that while blogging. I hope you'll find these posts informative :)
Today I'm starting it off with how I write my reviews. I'll do some examples and stuff, so it might get really detailed ;) Hope you don't mind!
  • Whatever product I review, I have at least used it 5 times and owned it for a whole 7-day-week. The only exception to that point: colored nail polish.
    Example:
    Let's pretend I'm using a new lipgloss. If I at least try it out 5 times, I can see how it works under which conditions, if my first impression stays the same or changes. And when owning it for a full week, I can tell whether the product itself changes in for example the texture.
  • Anything I start to use, I try it in a lot of different ways.
    Example:
    Say I'm trying out a new blush. Then I don't only apply it with my regular brush, but also with some other ones so I get an overview of how well it applies with what type of brush.
  • I do a hard-conditions-test at least twice.
    Example:
    When I'm planning on doing a review about an eyeliner, the hard-conditions-test is first how it stays without a base, then second how it stays when I do sports and third how it reacts when it gets in tough with water.
  • I try to mix my first impression when buying it with the impression I got when using it for the first time, and that with the impression I got after a week.
    Example:
    When I buy for example an eyeshadow, I buy it because it looks nice and good. So my first impression is almost always positive. But then when I first try it, it lacks pigmentation, and it stays that way every time I use it. Then I of course can't do a review about only the first impression I got.
  • I look at the product objectively.
    Example:
    Say I got a new blush and I love love love the packaging because it's so adorable and the color's pretty, too. But it isn't pigmented at all and fades after 1 hour of wearing it. If I'd write a positive review now, only because I'm a sucker for cute packaging, it'd be subjective. But I don't do that.
  • I always think about what would interest my readers.
    Example:
    When I'm wearing a new nail polish, I think about what kind of comparisons in terms of brush, color, formula and availability you would be interested in.
  • I also have a few adjectives on how my reviews should always be:
    honest
    detailed
    not-leaving-out-anything 
So this is how I do the texts in my review :)
I hope you like this idea of the Blogging-Techniques and find it helpful :) Maybe some of you will find some things they can incorporate to their own reviews, and maybe you'd be able to give me some feedback if there's something missing on my list, if I need to look for something else when doing my reviews :)
What do you think?
Until next time, 
xoxo, Misch